Sync Claude Code config across machines with cclayer (CLAUDE.md, skills, plugins, MCP) and keep git identities separate per team
After using Claude Code for a while, ~/.claude fills up with stuff: a global CLAUDE.md, a bunch of rules, skills, hooks, permissions and plugins in settings.json, plus a pile of MCP servers. I use Claude Code on several machines, and every one of them had to be set up again by hand. Change a rule on one machine and I had to repeat it on the others, and after a while the configs on each machine stopped matching.
The bigger headache is that my projects come from different teams. Each team uses a different git commit identity (name and email), and some teams have their own rules and hooks. Those should only apply inside that team’s projects. They must not leak into other projects, and I definitely don’t want a company email showing up in commits to my own open-source repos.
Just throwing ~/.claude into a git repo doesn’t work either: it holds login state, session history and machine-local permissions, and team-specific stuff can’t go into a public repo. So I wrote cclayer to deal with exactly this.
What cclayer is
cclayer splits Claude Code’s config into two kinds of “layers”:
- Base layer: what’s the same on every machine.
CLAUDE.md,rules/,skills/,output-styles/,agents/, hook scripts, the shared keys insettings.json, the plugin and marketplace list, and MCP definitions. It contains no identity information, so it can live in a public repo. - Overlay: one per team. It holds that team’s git identity, hooks, repository URL rules (e.g.
github.com/acme-inc/*), and the.claude/settings.local.jsonandCLAUDE.local.mdto write into those projects. An overlay only takes effect in matching projects and never writes anything into~/.claude.
Each machine pulls the base layer plus whichever overlays it needs. cclayer apply lays everything out in one command, and cclayer push sends local changes back in one command.
A layer can be a git repo, or just a directory inside a cloud drive sync folder, so you can use it without touching git at all.
Installation
On macOS, use Homebrew:
brew install --cask zhaojiannet/tap/cclayerTo upgrade later:
brew upgrade --cask cclayerOn Linux and Windows, download the binary from the Releases page. git needs to be installed first; the plugin and MCP steps need Claude Code 2.1.288 or later.
The simplest setup: one person, a few machines
If you don’t have teams to keep apart, a single base layer is enough.
First machine
cclayer setupsetup is a full-screen config UI. The left pane lists the layers and local machine settings, the right pane shows a description of the selected item and its editable fields, and nothing is written to disk until you save. The UI is available in Simplified Chinese, English and Japanese, and follows the system language by default.
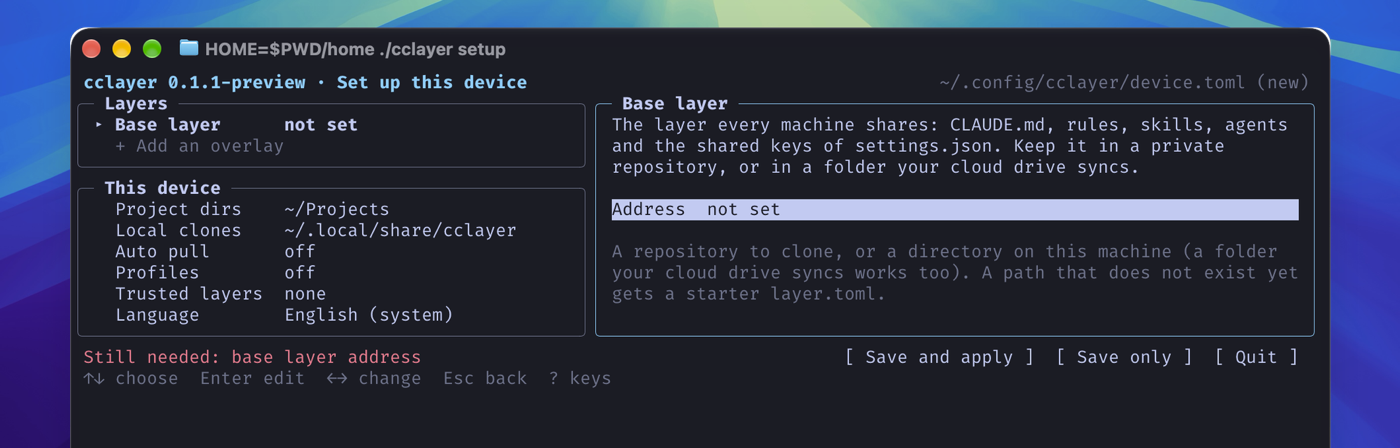
You only need to fill in two things:
- Base layer: a directory (e.g.
~/Dropbox/cclayer/basein your cloud drive) or a private git repo URL. If the directory doesn’t exist yet, a starterlayer.tomlis generated when you save. - Projects directory: where your code lives, e.g.
~/Projects.
Choose “Save and apply”, then pull this machine’s existing config into the layer:
cclayer capture --add CLAUDE.md --add rules/ --add skills/Paths are relative to ~/.claude. Every file is checked before it goes in: things like secrets, email addresses and absolute paths pointing to your home directory get blocked, and you’re told which line they’re on. If the layer is only for you and lives somewhere private, add private = true under [layer] in layer.toml and emails won’t be blocked anymore.
Other machines
Install cclayer, run cclayer setup the same way, point the base layer at the same location, choose “Save and apply”, and the config from the first machine shows up. Files that already exist locally with different content are listed, and you’re asked whether to overwrite them. Old files are backed up to ~/.local/state/cclayer/backups/ before being overwritten.
Day-to-day sync
If your layers are git repos:
cclayer push # upload: collect local changes, list what will be committed, commit and push after confirmationcclayer apply --pull # download: pull the latest layers, then lay them out locallyIf your layers are cloud drive directories, the drive handles syncing: run cclayer capture after making changes, and cclayer apply on the other machine.
You can also put the following SessionStart hook into the base layer’s claude/settings.json and turn on “Auto pull” in setup. From then on, every new Claude Code session pulls and applies automatically:
{ "hooks": { "SessionStart": [{ "matcher": "startup", "hooks": [{ "type": "command", "command": "command -v cclayer >/dev/null && cclayer apply --hook || true" }] }] }}Different git identities for different teams
This is the main reason I wrote cclayer. First create a private repo for the team and put a layer.toml at its root, declaring the identity and which repos it matches:
[layer]name = "acme"kind = "overlay"
[identity]name = "Full Name"email = "me@acme.example"
[[match]]remote = "github.com/acme-inc/*"Then add this overlay on the machines that need it. It asks how you want to set up access credentials for the repo, then clones it and checks it:
cclayer layer add acme git@github.com:you/cclayer-acme.gitAfter apply, cclayer appends an include block to the end of ~/.gitconfig, using git’s includeIf "hasconfig:remote.*.url:..." so this identity only applies in repos whose remote URL matches github.com/acme-inc/*. Everything already in ~/.gitconfig is left untouched. If the default identity (default_identity) is left empty, git refuses to commit in any repo that no overlay matches, so you can’t end up committing with the wrong email.
Match rules must spell out the host and organization; wildcards can’t stand in for them, so one team’s overlay can’t claim another team’s repos.
If you also want each team’s Claude Code login, sessions and prompt history fully separated, turn on profiles mode. Each overlay then gets its own ~/.claude-profiles/<layer-name> config directory, cclayer env prints the matching CLAUDE_CONFIG_DIR, and with direnv each project automatically uses its own config.
Security
Synced hooks and skills get executed by Claude Code on your machine, so cclayer is fairly careful here:
- Settings that run programs or enable plugins, like
hooks,statusLineandenabledPlugins, as well as files underhooks/andskills/and any executable files, are listed for you to confirm before they’re written. Once you’ve confirmed a given piece of content, you won’t be asked about it again. - git config snippets only allow common settings like
pull.rebaseandpush.default. Keys that can run programs, such as aliases,core.hooksPathandcredential.helper, require explicitly trusting the layer in the device manifest. - Claude Code’s login state,
history.jsonlandprojects/are never read into a layer, andpermissions.allowandenvstay local. - Symlinks aren’t allowed inside layers, and symlinks are never followed when writing files.
Common commands
| Command | What it does |
|---|---|
cclayer setup | Full-screen config UI, for first-time setup and later changes |
cclayer apply | Lay out all layers on this machine; --pull pulls first |
cclayer capture | Write local changes back into the layers without committing |
cclayer push | Capture, then commit and push each layer repo |
cclayer check | Check layers for content that shouldn’t be there |
cclayer status | git status of each layer and the projects it matches |
cclayer keys setup <layer> | Set up access credentials for a layer repo on this machine (deploy key or HTTPS token) |
cclayer layer add <name> <url> | Add an overlay to this machine |
cclayer leave <layer> | Remove a layer from this machine and clean up what it wrote |
cclayer doctor | Check for common Claude Code and git problems |
For more detail, including how to set up the git repos, credentials for private repos, and an FAQ, see the cclayer tutorial.
GitHub repository: https://github.com/zhaojiannet/cclayer